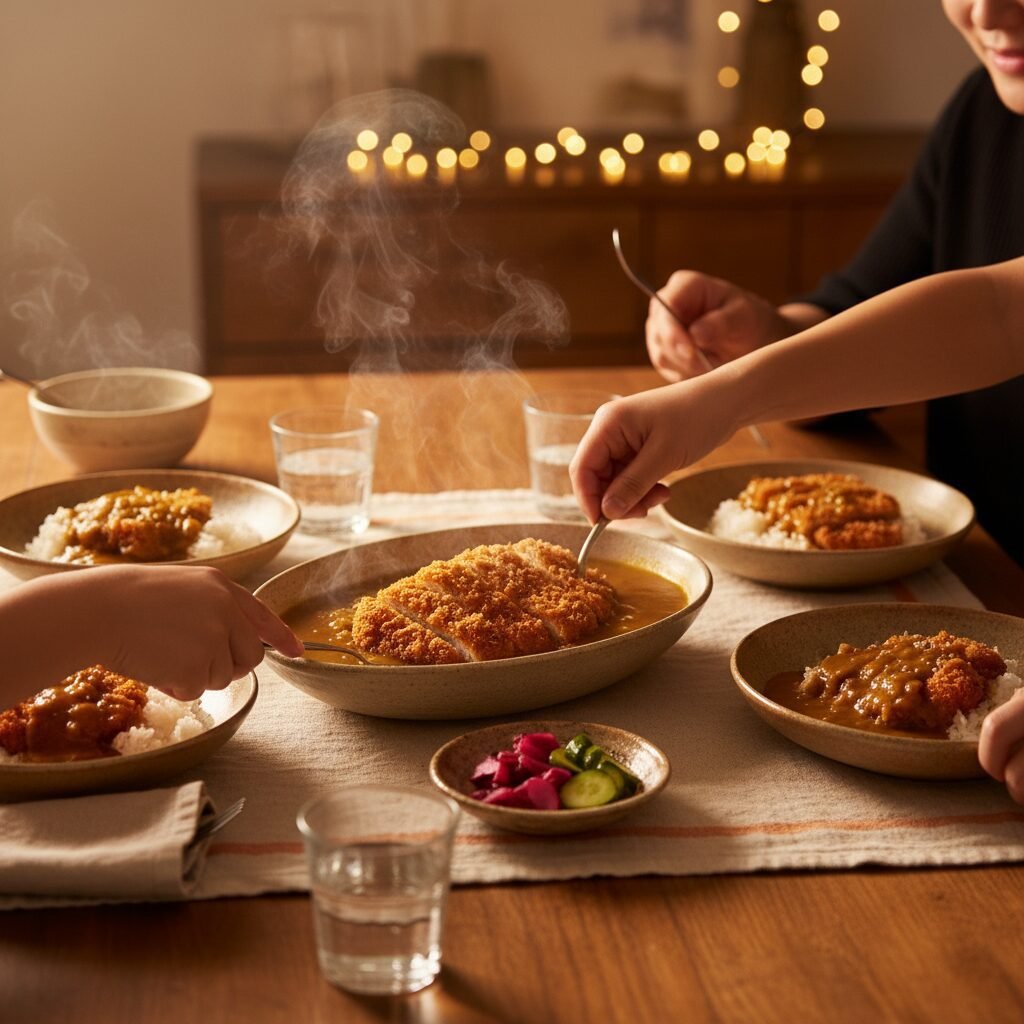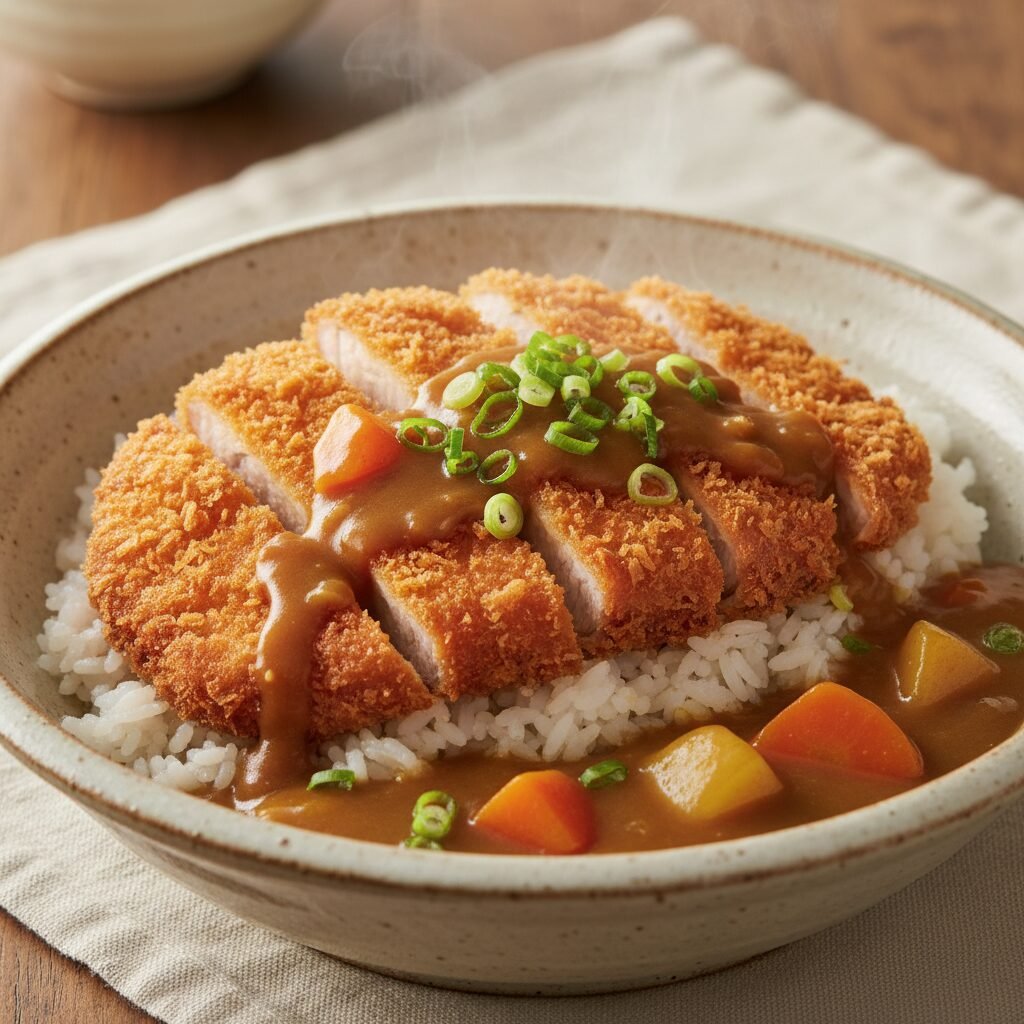
Golden Pork Katsu Curry: The Ultimate Comfort Food Bowl
Golden Pork Katsu Curry: The Ultimate Comfort Food Bowl
Get ready to bring a taste of Japan right into your kitchen with this incredible Golden Pork Katsu Curry! It’s a dish that promises crispy, tender pork cutlets nestled in a rich, savory curry sauce, all served over fluffy rice. Perfect for a cozy family dinner or a special weekend treat, this recipe is pure comfort in a bowl.
30 minutes
40 minutes
1 hour 10 minutes
4 servings
Main Dish
Frying, Simmering
Japanese
Pork, Comfort Food
Oh, sweet friends, if there’s one dish that truly wraps you in a warm, comforting hug, it has to be a perfectly made Katsu Curry. Imagine: a golden, crispy pork cutlet, so tender on the inside, bathed in a velvety, aromatic Japanese curry sauce, all piled high on a bed of steamy, fluffy rice. It’s not just a meal; it’s an experience, a moment of pure bliss that transports you straight to a bustling Japanese eatery, right from your very own kitchen!
As a busy mom, I’m always on the hunt for recipes that feel special, taste amazing, and still manage to be achievable on a weeknight (or at least a relaxed weekend!). This Golden Pork Katsu Curry ticks all those boxes and more. It’s got that irresistible crunch, that deep, savory flavor, and that satisfying warmth that makes everyone at the table sigh with contentment. Trust me, once you make this, it’s going to become a cherished family favorite, requested again and again.
I know what you might be thinking: ‘Curry? Katsu? Sounds complicated!’ But I promise you, it’s much simpler than it seems. With a few key ingredients and my step-by-step guide, you’ll be whipping up this restaurant-quality dish like a seasoned pro. So, tie on your apron, put on your favorite playlist, and let’s create some culinary magic together. Your taste buds (and your family!) will thank you!
History & Origins
The story of Katsu Curry is a delightful fusion tale, blending Japanese culinary traditions with Western influences. ‘Katsu’ is short for ‘katsuretsu,’ derived from the English word ‘cutlet,’ and refers to a deep-fried, breaded cutlet. While pork katsu (tonkatsu) itself has roots in late 19th-century Japan, inspired by European schnitzel, the addition of curry sauce came a bit later.
Japanese curry, or ‘karē,’ was introduced to Japan by the British during the Meiji era (1868-1912), who had, in turn, adopted it from India. Over time, the Japanese adapted the spice blend to suit their palate, creating a milder, sweeter, and thicker curry that became incredibly popular. It wasn’t until the mid-20th century that someone brilliant decided to combine the crispy, savory tonkatsu with the rich, comforting Japanese curry sauce. The result? A match made in culinary heaven!
Katsu Curry quickly became a beloved staple in Japanese homes, school cafeterias, and casual restaurants, cherished for its satisfying flavors and textures. It’s a testament to how different culinary cultures can beautifully intertwine to create something truly unique and universally adored. And now, we get to bring that delicious history right into our own homes!
Why This Recipe Works
There’s a reason Golden Pork Katsu Curry is such a beloved dish, and it all comes down to a masterful interplay of textures, flavors, and temperatures. First, let’s talk about the pork katsu. The magic here lies in the breading. Using panko breadcrumbs creates an incredibly light, airy, and super crispy crust that shatters with every bite, providing a delightful contrast to the tender, juicy pork inside. The deep-frying process ensures a perfectly cooked cutlet that’s golden brown and irresistible.
Then, we have the Japanese curry sauce. Unlike its spicier Indian counterparts, Japanese curry is known for its rich, savory, slightly sweet, and wonderfully umami-packed flavor profile. It’s often thickened with a roux, giving it a luxurious, velvety texture that clings beautifully to the katsu and rice. The blend of spices, often including turmeric, cumin, coriander, and sometimes a touch of apple or honey, creates a complex yet comforting taste that’s deeply satisfying without being overwhelmingly spicy.
When these two elements come together, magic happens. The warm, aromatic curry sauce softens some of the crispy katsu, creating a delightful textural gradient from crunchy to slightly yielding. The fluffy white rice acts as the perfect canvas, soaking up all that delicious curry goodness and balancing the richness of the pork. It’s a complete meal in one bowl, offering a symphony of flavors and textures that truly makes it the ultimate comfort food.
Why You’ll Love This Recipe
- ✓Achieve perfectly crispy, golden pork katsu every time.
- ✓Master a rich, savory, and slightly sweet Japanese curry sauce from scratch.
- ✓Enjoy a comforting, restaurant-quality meal that’s surprisingly easy to make at home.
- ✓A delightful blend of textures: crunchy katsu, velvety curry, and fluffy rice.
- ✓Perfect for family dinners, special occasions, or a cozy night in.
Equipment You’ll Need
- ✓Large skillet or Dutch oven
- ✓Deep fryer or large heavy-bottomed pot
- ✓Wire rack
- ✓Baking sheet
- ✓Shallow dishes for breading station
- ✓Meat mallet or rolling pin
- ✓Sharp knife
- ✓Cutting board
- ✓Whisk
- ✓Measuring cups and spoons
- ✓Rice cooker or saucepan for rice
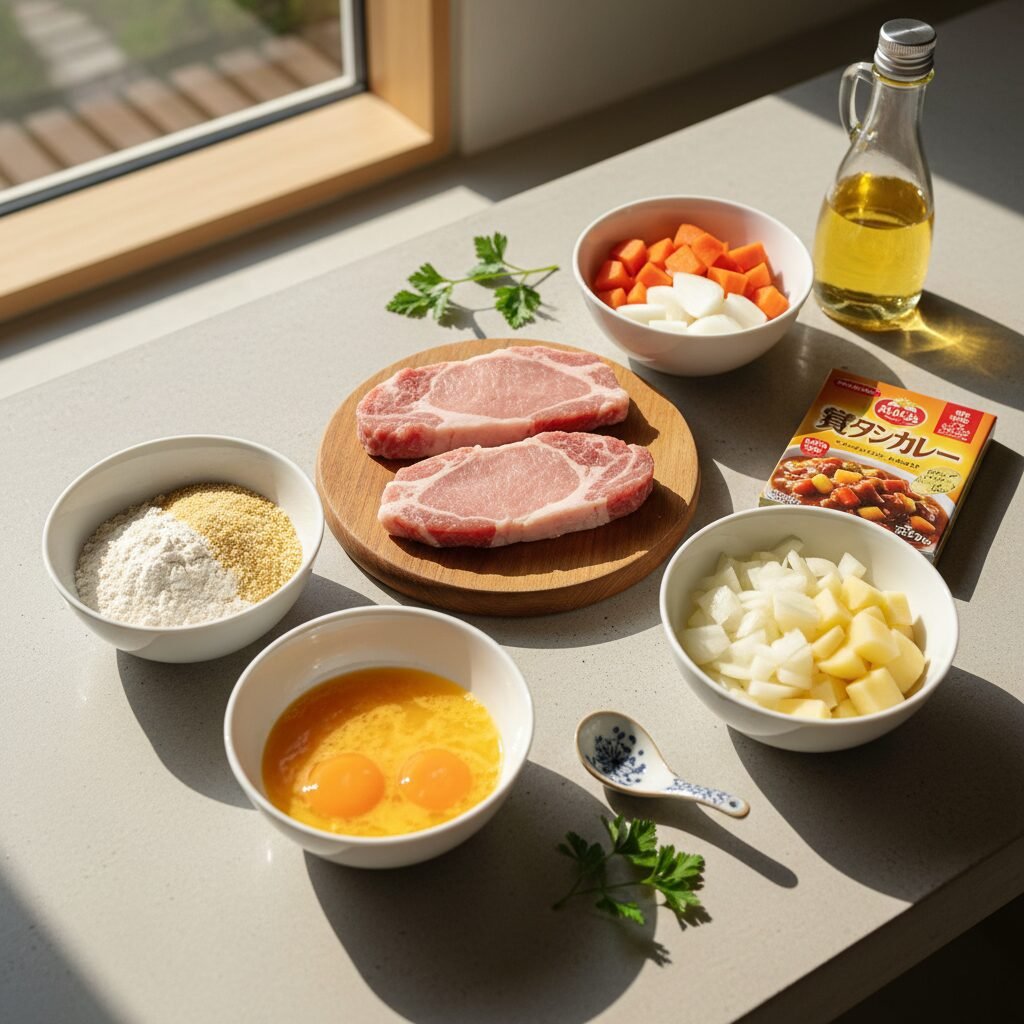
Ingredients
- ✓For the Pork Katsu:
- ✓4 boneless pork loin chops (about 1/2 inch thick, 6-8 oz each)
- ✓Salt and freshly ground black pepper, to taste
- ✓1/2 cup all-purpose flour
- ✓2 large eggs, beaten
- ✓2 cups panko breadcrumbs
- ✓4-6 cups vegetable oil, for deep frying
- ✓For the Japanese Curry Sauce:
- ✓2 tablespoons vegetable oil
- ✓1 large yellow onion, chopped
- ✓2 carrots, peeled and diced
- ✓2 potatoes, peeled and diced
- ✓4 cups chicken or vegetable broth
- ✓1/4 cup Japanese curry roux blocks (about 2-3 cubes, depending on brand)
- ✓1 tablespoon soy sauce
- ✓1 teaspoon honey or sugar (optional, to taste)
- ✓For Serving:
- ✓Cooked short-grain white rice
- ✓Fukujinzuke (pickled daikon and lotus root), optional
- ✓Chopped fresh parsley or scallions, for garnish

Instructions
- 1. Prepare the Pork Katsu: Pat the pork chops dry with paper towels. Place each chop between two sheets of plastic wrap and pound with a meat mallet or rolling pin to an even 1/4 to 1/3-inch thickness. Season both sides generously with salt and pepper.
- 2. Set Up Breading Station: Prepare three shallow dishes. In the first, place the flour. In the second, whisk the beaten eggs. In the third, place the panko breadcrumbs.
- 3. Bread the Pork: Dredge each pork chop in the flour, shaking off any excess. Dip it into the beaten egg, ensuring it’s fully coated. Finally, press it firmly into the panko breadcrumbs, making sure the entire surface is covered. Gently press the panko onto the pork to adhere well. Place the breaded cutlets on a wire rack set over a baking sheet.
- 4. Start the Curry Sauce: In a large skillet or Dutch oven, heat 2 tablespoons of vegetable oil over medium heat. Add the chopped onion and cook until softened and translucent, about 5-7 minutes. Add the diced carrots and potatoes, and cook for another 5 minutes, stirring occasionally.
- 5. Simmer the Curry: Pour in the chicken or vegetable broth. Bring to a simmer, then reduce heat to low, cover, and cook for 15-20 minutes, or until the vegetables are tender. Stir in the curry roux blocks until completely dissolved. Add soy sauce and honey/sugar (if using), stirring until the sauce thickens to your desired consistency. Keep warm over very low heat, stirring occasionally.
- 6. Fry the Katsu: While the curry simmers, heat 4-6 cups of vegetable oil in a deep fryer or large heavy-bottomed pot to 350°F (175°C). Carefully lower 1-2 katsu cutlets into the hot oil (do not overcrowd the pot). Fry for 3-4 minutes per side, or until golden brown and cooked through (internal temperature reaches 145°F/63°C).
- 7. Drain and Rest: Using tongs, carefully remove the fried katsu and place them on a clean wire rack set over a baking sheet to drain excess oil. This helps keep them crispy. Repeat with remaining cutlets.
- 8. Slice the Katsu: Once all katsu are fried, let them rest for a minute or two. Then, using a sharp knife, slice each katsu into 1-inch wide strips.
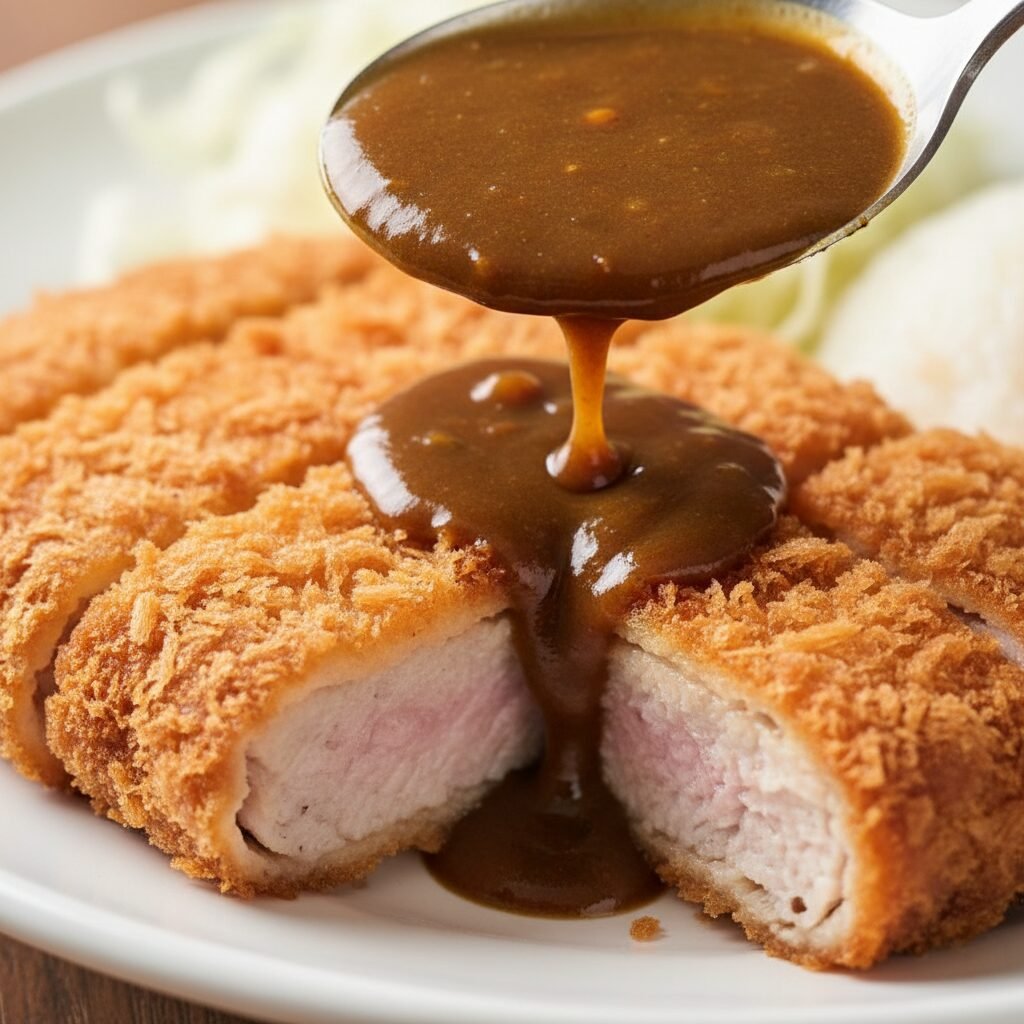
- 9. Assemble and Serve: Ladle a generous portion of cooked white rice into individual serving bowls. Arrange the sliced pork katsu over one side of the rice. Spoon a generous amount of the warm Japanese curry sauce over the katsu and alongside the rice. Garnish with chopped parsley or scallions and serve immediately with fukujinzuke, if desired. Enjoy your ultimate comfort food bowl!
Expert Cooking Tips
- ✓Pound the pork evenly: This ensures even cooking and tender results. Aim for about 1/4 to 1/3 inch thickness.
- ✓Press panko firmly: Really press those panko breadcrumbs onto the pork to create a thick, even coating that won’t fall off during frying.
- ✓Maintain oil temperature: Use a thermometer to keep your oil at a consistent 350°F (175°C). Too low, and the katsu will be greasy; too high, and it will burn before cooking through.
- ✓Don’t overcrowd the pot: Fry katsu in batches to maintain oil temperature and ensure even cooking and crispiness.
- ✓Drain on a wire rack: This allows air to circulate around the katsu, preventing it from getting soggy.
- ✓Adjust curry consistency: If your curry is too thick, add a splash of broth or water. If it’s too thin, let it simmer uncovered for a few more minutes, or add a tiny bit more roux.
- ✓Taste and adjust: Always taste your curry before serving and adjust seasonings. A pinch of sugar or a dash more soy sauce can make a big difference.
Substitutions and Variations
While pork katsu is traditional, you can absolutely customize this recipe! For a chicken version, use boneless, skinless chicken breasts or thighs, pounded thin, for Chicken Katsu Curry. If you’re looking for a vegetarian option, try using thick slices of eggplant, firm tofu, or even portobello mushrooms instead of meat for a delicious plant-based katsu. For the curry sauce, feel free to add other vegetables like bell peppers, green beans, or even a handful of spinach towards the end of cooking. If you can’t find Japanese curry roux blocks, you can make a curry from scratch using curry powder, flour, and butter for a roux, then adding broth and seasonings, though the flavor profile will be slightly different.
Common Mistakes to Avoid
One of the most common mistakes when making katsu is not pounding the meat evenly, leading to uneven cooking. Another pitfall is not pressing the panko firmly enough, which can result in the breading falling off during frying. For the curry, not stirring regularly can cause the roux to stick and burn at the bottom of the pot. Finally, overcrowding the frying oil is a big no-no; it drops the oil temperature, leading to greasy, soggy katsu instead of crispy perfection. Always fry in batches!
Serving Suggestions
This Golden Pork Katsu Curry is a complete meal on its own, but there are a few ways to elevate the experience! Traditionally, it’s served with a side of fukujinzuke (Japanese pickled vegetables) which offers a delightful tangy contrast to the rich curry. A simple side salad with a ginger dressing or a light miso soup would also be wonderful additions. For an extra touch of freshness, a sprinkle of chopped scallions or fresh parsley is always a good idea. Sometimes, I even add a soft-boiled egg on top for an extra layer of richness!
Storage and Reheating Tips
Leftover Katsu Curry can be stored in airtight containers in the refrigerator for up to 3-4 days. It’s best to store the katsu and curry sauce separately if possible, to help maintain the katsu’s crispiness. When reheating, I recommend reheating the curry sauce gently on the stovetop or in the microwave. For the katsu, reheating it in a toaster oven or air fryer is best to bring back some of its crispiness, rather than microwaving it which can make it soggy. You can also freeze the curry sauce (without the katsu) for up to 2-3 months. Thaw overnight in the refrigerator before reheating.
Nutrition Facts (Estimated)
| Serving Size | 1 bowl |
| Calories | 750 kcal |
| Fat | 45g |
| Saturated Fat | 15g |
| Unsaturated Fat | 25g |
| Trans Fat | 0.5g |
| Cholesterol | 100mg |
| Sodium | 850mg |
| Carbohydrates | 60g |
| Fiber | 4g |
| Sugar | 15g |
| Protein | 35g |
Frequently Asked Questions
Can I make this recipe gluten-free?
Yes! For gluten-free katsu, use gluten-free flour and gluten-free panko breadcrumbs. For the curry, ensure your Japanese curry roux blocks are gluten-free, or make your own gluten-free curry sauce from scratch using gluten-free flour for the roux.
What kind of pork should I use?
Boneless pork loin chops are ideal for katsu as they are lean and tender. You can also use pork tenderloin, sliced into medallions and pounded.
Can I bake or air fry the katsu instead of deep frying?
While deep frying yields the crispiest results, you can air fry or bake the katsu for a lighter option. For air frying, spray generously with oil and air fry at 375°F (190°C) for 12-15 minutes, flipping halfway. For baking, bake at 400°F (200°C) for 20-25 minutes, flipping halfway, until golden and cooked through. The texture won’t be quite the same, but it will still be delicious!
How can I make the curry spicier?
Many Japanese curry roux brands offer different spice levels (mild, medium, hot). You can choose a hotter roux. Alternatively, add a pinch of cayenne pepper, a dash of chili oil, or a few slices of fresh red chili to the curry sauce while it simmers.
Can I prepare parts of this recipe ahead of time?
Absolutely! You can bread the pork katsu up to a day in advance and store it uncovered in the refrigerator (on a wire rack) to prevent sogginess. The curry sauce can be made entirely ahead of time and stored in the refrigerator for up to 3-4 days, or frozen. Reheat gently before serving.
What if my curry sauce is too thin or too thick?
If it’s too thin, let it simmer uncovered for a bit longer to reduce, or add a small amount of cornstarch slurry (1 tsp cornstarch mixed with 1 tsp cold water) and simmer until thickened. If it’s too thick, simply add a splash of broth or water until it reaches your desired consistency.
What are panko breadcrumbs and why are they important?
Panko are Japanese breadcrumbs that are coarser, lighter, and flakier than traditional Western breadcrumbs. They absorb less oil and create a much crispier, airier coating, which is essential for authentic katsu.
Can I use chicken broth instead of vegetable broth in the curry?
Yes, absolutely! Chicken broth will add a richer, more savory depth of flavor to the curry sauce. Vegetable broth is a great option for a lighter flavor or if you’re aiming for a vegetarian curry (when paired with a vegetarian katsu).
Conclusion
And there you have it, my dear friends – your very own masterpiece of Golden Pork Katsu Curry! This dish is more than just a recipe; it’s an invitation to create warmth, comfort, and delicious memories in your home. From the satisfying crunch of the katsu to the rich, velvety embrace of the curry, every spoonful is a testament to simple ingredients coming together to create something truly extraordinary. It’s the kind of meal that brings smiles to faces, fills bellies with happiness, and makes everyone feel a little more loved.
So, go ahead, gather your loved ones, and share this incredible culinary journey. Don’t be afraid to make it your own, add your personal touch, and savor every single bite. I truly hope this recipe brings as much joy and comfort to your table as it does to mine. Happy cooking, and remember, the best meals are always made with a sprinkle of love!