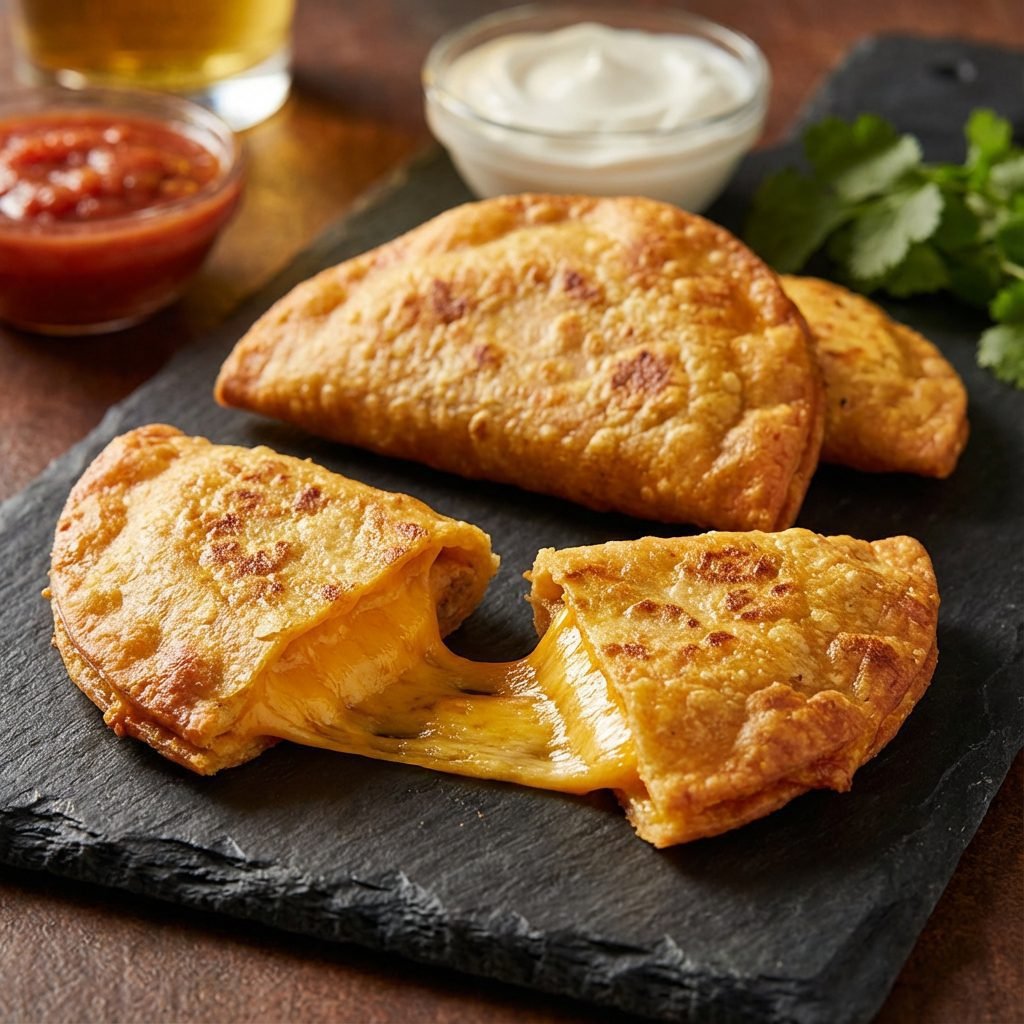
3-Ingredient Crispy Corn Pockets Stuffed With Melty Cheese
3-Ingredient Crispy Corn Pockets Stuffed With Melty Cheese
Welcome to the pinnacle of culinary simplicity and comfort food satisfaction. In a world of complex recipes and long ingredient lists, we’re here to champion the profound joy that comes from creating something utterly delicious with minimal effort. Today, we present a recipe that is almost magical in its simplicity: 3-Ingredient Crispy Corn Pockets Stuffed With Melty Cheese. This isn’t just a recipe; it’s a solution. It’s the answer to ‘What’s for a snack?’, the perfect quick lunch, a crowd-pleasing appetizer, and the ultimate late-night craving-killer. Imagine a golden, blistered corn tortilla, crisped to perfection, giving way to a core of gooey, molten cheese. It’s a textural and flavorful masterpiece born from three humble ingredients you likely already have on hand. Forget complicated techniques and hours in the kitchen. We’re about to unlock a world of flavor in under 20 minutes.
5 minutes
10-12 minutes
15-17 minutes
8 pockets
Snack
Pan-Frying
American
Vegetarian
Why You’ll Love This Recipe
- Incredibly Simple: Made with just three basic ingredients.
- Quick and Easy: From kitchen counter to plate in under 20 minutes.
- Kid-Friendly Favorite: A guaranteed hit with even the pickiest eaters.
- Budget-Friendly: An economical snack or light meal that doesn’t compromise on taste.
- Endlessly Versatile: Perfect as a snack, appetizer, or side dish.
- Naturally Gluten-Free: Uses corn tortillas, making it accessible for those with gluten sensitivities.
Equipment You’ll Need
- Large non-stick skillet or cast-iron pan
- Flexible spatula
- Plate lined with paper towels
- Cutting board
Ingredients
- 8 small (6-inch) corn tortillas
- 1 cup shredded cheese (medium cheddar, Monterey Jack, or a Mexican blend works best)
- 2 tablespoons neutral oil for frying (such as canola, vegetable, or avocado oil)
Instructions
- Step 1: Warm the Tortillas. This is the most crucial step to prevent cracking. Wrap the stack of 8 corn tortillas in a damp paper towel. Microwave on high for 30-45 seconds, or until they are warm and pliable. Alternatively, you can warm them one by one in a dry skillet over medium heat for about 15-20 seconds per side.
- Step 2: Fill the Pockets. Lay a warm tortilla flat on your cutting board. Spoon approximately 2 tablespoons of shredded cheese onto one half of the tortilla, leaving about a 1/2-inch border along the edge.
- Step 3: Fold and Seal. Gently fold the empty half of the tortilla over the cheese-filled half to create a half-moon shape. Press down gently along the curved edge to seal the pocket. Don’t worry if it’s not perfectly sealed; the melting cheese will help hold it together. Repeat with the remaining tortillas and cheese.
- Step 4: Heat the Skillet. Place your large non-stick skillet over medium heat. Add the 2 tablespoons of oil and allow it to heat up for about a minute. The oil should shimmer slightly when it’s ready. You can test it by dropping a single shred of cheese in; if it sizzles, the oil is hot enough.
- Step 5: Cook the Pockets. Carefully place 2 to 4 pockets in the hot skillet, ensuring you don’t overcrowd the pan. Cook for 2-3 minutes per side, until the tortilla is golden brown, crispy, and blistered in spots. You should see the cheese inside is fully melted and gooey.
- Step 6: Drain and Serve. Using a spatula, transfer the cooked pockets to the plate lined with paper towels to absorb any excess oil. Repeat the cooking process with the remaining pockets, adding a little more oil to the pan if needed.
- Step 7: Serve Immediately. These pockets are best enjoyed hot and fresh while the cheese is perfectly melty and the exterior is crispy. Serve with your favorite dips.
Expert Cooking Tips
- The Tortilla Trick: Do not skip warming the tortillas. Cold corn tortillas are brittle and will crack the moment you try to fold them. The steam created by the damp paper towel in the microwave makes them soft and flexible.
- Don’t Overstuff: It’s tempting to pack in as much cheese as possible, but overfilling will cause the cheese to ooze out, burn in the pan, and create a mess. Two tablespoons per pocket is the sweet spot.
- Master Your Heat: Medium heat is crucial. If the heat is too high, the tortillas will burn before the cheese has a chance to melt. If it’s too low, the pockets will absorb too much oil and become greasy instead of crispy.
- Press for Success: As the pockets cook, use your spatula to gently press them down. This ensures maximum contact with the hot pan, creating an evenly golden and crispy crust.
Substitutions and Variations
While the beauty of this recipe lies in its 3-ingredient simplicity, it’s also a fantastic canvas for creativity. For a spicy kick, use pepper jack cheese or add a few slices of pickled jalapeño with the cheese. Flour tortillas can be used in a pinch, though they will result in a softer, less crispy texture. For extra flavor, feel free to sprinkle in cooked bacon bits, finely chopped green onions, or a dash of chili powder with the cheese before folding.
Common Mistakes to Avoid
The most common mistake is using cold, brittle corn tortillas, which leads to cracking and frustration. Always warm them first until they are soft and pliable. Another frequent issue is using heat that is too high, resulting in a burnt exterior and a solid, unmelted cheese center. Be patient and stick to medium heat. Finally, avoid overcrowding the pan. Cooking in batches gives each pocket enough space to crisp up properly; overcrowding will steam them and make them soft.
Serving Suggestions
Serve these crispy cheese pockets immediately with a variety of dipping sauces. Classic choices like salsa, sour cream, and guacamole are always winners. For a more elevated experience, try a chipotle aioli, a fresh pico de gallo, or a creamy avocado-lime dip. To turn this snack into a light meal, serve it alongside a bowl of hot tomato soup or a simple side salad with a vinaigrette dressing.
Storage and Reheating Tips
While best eaten fresh, leftovers can be stored. Allow the pockets to cool completely, then place them in an airtight container in the refrigerator for up to 3 days. To reheat and restore their signature crispiness, place them in an air fryer at 350°F (175°C) for 3-4 minutes, a toaster oven, or a dry non-stick skillet over medium-low heat. We strongly advise against using a microwave, as it will make the tortillas tough and soggy.
Nutrition Facts (Estimated)
| Serving Size | 1 pocket |
| Calories | 165 kcal |
| Fat | 10g |
| Saturated Fat | 5g |
| Unsaturated Fat | 5g |
| Trans Fat | 0g |
| Cholesterol | 25mg |
| Sodium | 280mg |
| Carbohydrates | 11g |
| Fiber | 2g |
| Sugar | 1g |
| Protein | 7g |
Frequently Asked Questions
Can I make these in an air fryer?
Absolutely! To make them in an air fryer, assemble the pockets as directed. Lightly spray both sides of each pocket with cooking spray. Place them in the air fryer basket in a single layer and cook at 375°F (190°C) for 6-8 minutes, flipping halfway through, or until golden and crispy.
Can I prepare these ahead of time?
Yes, you can assemble the pockets ahead of time. Fill and fold the tortillas, then lay them in a single layer on a baking sheet. Cover with plastic wrap and refrigerate for up to 24 hours. When you’re ready to eat, you can cook them directly from the fridge.
What’s the best type of cheese to use?
A good melting cheese is key. We recommend low-moisture cheeses like medium cheddar, Monterey Jack, Colby, or a pre-shredded Mexican blend. Avoid fresh, high-moisture cheeses like fresh mozzarella, as they can release too much water and make the pockets soggy.
Conclusion
There you have it—a recipe that proves you don’t need a long list of ingredients or a lot of time to create something truly spectacular. These 3-Ingredient Crispy Corn Pockets are a testament to the power of simplicity in the kitchen. They are a reliable, delicious, and endlessly adaptable staple that you’ll return to again and again. Whether you’re feeding a hungry family, hosting a last-minute get-together, or simply treating yourself, these cheesy delights are sure to impress. We encourage you to try the basic recipe first, then let your creativity run wild with different cheeses and fillings. Happy cooking!