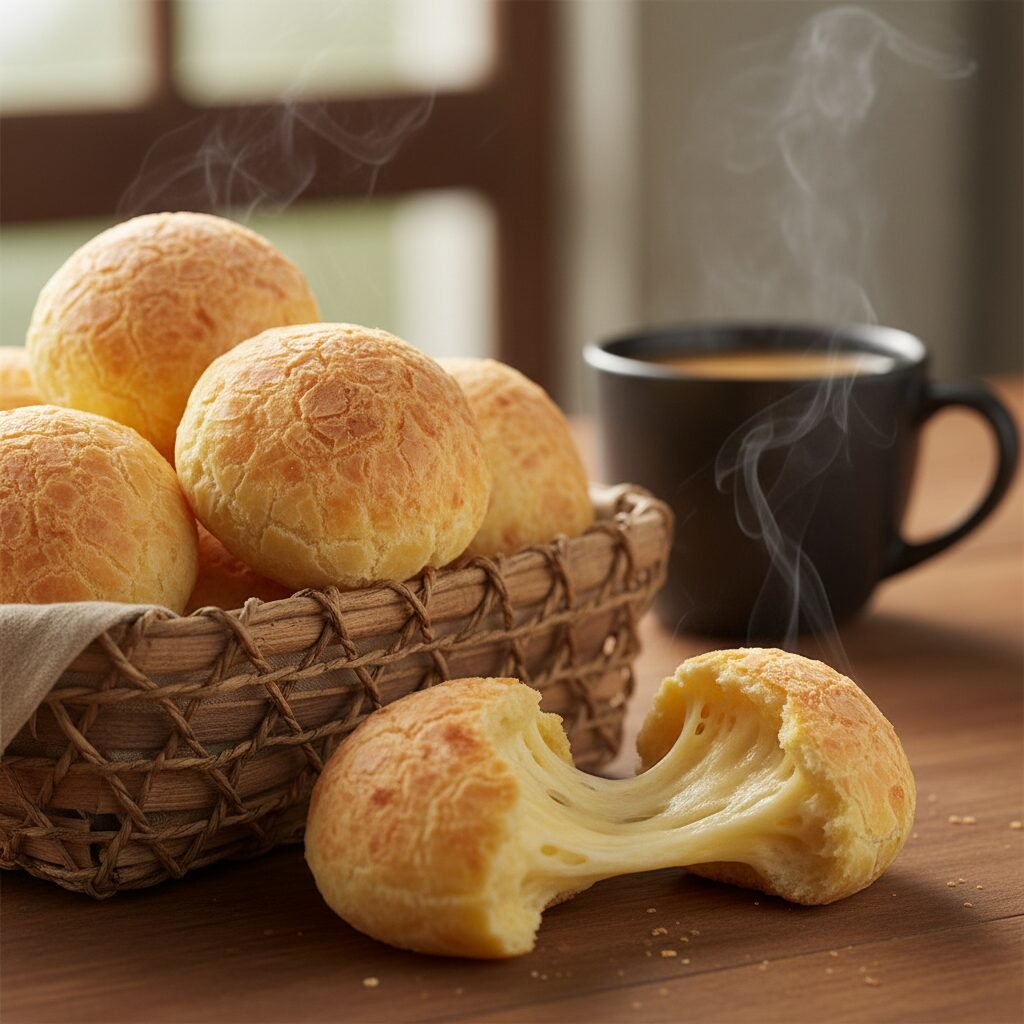
3-Ingredient Brazilian Cheese Bread: Gluten-Free and Impossible to Stop Eating
3-Ingredient Brazilian Cheese Bread: Gluten-Free And Impossible To Stop Eating
Welcome to what might be the simplest, most rewarding baking recipe you’ll ever try. Pão de Queijo, or Brazilian Cheese Bread, is a beloved snack and breakfast staple throughout Brazil, and for good reason. These delightful little puffs are crispy on the outside, incredibly light and airy on the inside, with a distinctively chewy, cheesy pull that is utterly addictive. What makes them truly special is their unique texture, a result of their star ingredient: tapioca flour. This naturally gluten-free starch creates a magical, mochi-like chewiness that wheat flour simply cannot replicate. While traditional recipes can be complex, involving scalding milk and multiple steps, this streamlined version requires just three essential ingredients and less than 30 minutes of your time. Prepare to be amazed as you transform a simple mixture of tapioca flour, cheese, and cream into golden, puffy bites of heaven that will disappear from the plate in minutes.
10 minutes
20 minutes
30 minutes
12-15 cheese breads
Appetizer/Snack
Baking
Brazilian
Gluten-Free
Why You’ll Love This Recipe
- Incredibly simple with only 3 core ingredients.
- Naturally gluten-free, perfect for those with dietary sensitivities.
- Ready from start to finish in under 30 minutes.
- Features a unique and addictive chewy, cheesy texture.
- Versatile snack, perfect for breakfast, appetizers, or alongside meals.
Equipment You’ll Need
- Mini muffin tin (24-cup)
- Large mixing bowl
- Whisk or silicone spatula
- Measuring cups and spoons
- Small cookie scoop (optional, for easy portioning)
Ingredients
- 1 ½ cups (170g) tapioca flour (also called tapioca starch)
- 1 cup (110g) finely grated cheese (see notes on substitutions)
- ¾ cup (180ml) heavy cream (or Brazilian table cream, ‘creme de leite’)
- ¼ teaspoon fine sea salt (optional, adjust based on the saltiness of your cheese)
Instructions
- Preheat and Prepare: Preheat your oven to 400°F (200°C). Generously grease a 24-cup mini muffin tin with butter or non-stick cooking spray. This is a crucial step as the cheesy dough loves to stick.
- Combine Ingredients: In a large mixing bowl, combine the tapioca flour, grated cheese, and optional salt. Whisk them together to ensure the cheese is evenly distributed throughout the flour.
- Form the Dough: Pour the heavy cream into the dry ingredients. Using a spatula or your hands, mix until everything is just combined and a sticky, cohesive dough forms. It will look somewhat like a thick, lumpy paste. Do not overmix.
- Portion the Dough: Using a small cookie scoop or two spoons, portion the sticky dough evenly into the prepared mini muffin tin cups. Fill each cup about three-quarters full. The dough will be sticky, so greasing your scoop or spoons can help.
- Bake to Perfection: Place the muffin tin in the preheated oven and bake for 15-20 minutes. The cheese breads are done when they have puffed up significantly and are a beautiful light golden brown on top. Some may have small cracks, which is perfectly normal.
- Cool and Serve: Remove the tin from the oven and let the cheese breads cool in the pan for a few minutes. This helps them set and makes them easier to remove. Gently twist them to release. For the absolute best experience, serve them warm while the cheese is still gooey and the texture is perfectly chewy.
Expert Cooking Tips
- Don’t Substitute the Flour: Tapioca flour (or starch) is the magic ingredient. Do not substitute it with all-purpose flour, cornstarch, or any other flour, as you will not achieve the signature chewy texture.
- Grate Your Own Cheese: Pre-shredded cheeses often contain anti-caking agents that can affect how the dough comes together and melts. For the best flavor and texture, grate a block of cheese yourself.
- Serve Immediately: Pão de Queijo are at their peak deliciousness when served warm from the oven. The texture changes as they cool, so enjoy them fresh for that perfect crispy-chewy combination.
- Don’t Overfill the Muffin Tin: These little breads puff up considerably during baking. Filling the cups about three-quarters full will give them room to expand into perfect, round puffs.
Substitutions and Variations
The beauty of this recipe lies in its adaptability, especially with the cheese. Traditionally, Brazilian ‘queijo Minas’ is used, but it can be hard to find. An excellent and widely available substitute is a mix of Parmesan and a good melting cheese. Try a 50/50 blend of finely grated Parmesan (for sharp, nutty flavor) and low-moisture mozzarella or Monterey Jack (for that cheesy pull). A sharp white cheddar also works wonderfully. For the cream, while heavy cream provides the best richness, you can substitute it with full-fat sour cream or thick Greek yogurt for a tangier result, though the texture may be slightly denser.
Common Mistakes to Avoid
The most common mistake is using the wrong flour. It must be tapioca flour/starch. Another frequent issue is the breads deflating after baking. This usually happens if they are underbaked. Make sure they are a solid golden brown color before removing them from the oven. Opening the oven door mid-bake can also cause them to fall, so resist the urge to peek! Finally, not greasing the muffin tin adequately can lead to a sticky mess. Be generous with your butter or cooking spray to ensure the cheese breads pop right out.
Serving Suggestions
Pão de Queijo are incredibly versatile. Enjoy them warm with a cup of strong coffee for a classic Brazilian breakfast. Serve them as an appetizer at a party—they are always the first thing to disappear from the platter. They are also a fantastic gluten-free alternative to bread rolls, perfect for serving alongside a hearty soup, stew, or chili. For a decadent snack, split one open while it’s still warm and spread a little butter or cream cheese inside.
Storage and Reheating Tips
Brazilian cheese breads are best eaten the day they are made. However, if you have leftovers, store them in an airtight container at room temperature for up to 2 days. Their texture will soften, but you can easily revive them. Reheat in a 350°F (175°C) oven or an air fryer for 3-5 minutes until the exterior is crisp again. For longer storage, this dough freezes exceptionally well. Portion the unbaked dough into balls, place them on a baking sheet, and freeze until solid. Transfer the frozen dough balls to a freezer-safe bag. You can bake them directly from frozen, just add 5-7 minutes to the original baking time.
Nutrition Facts (Estimated)
| Serving Size | 1 cheese bread |
| Calories | 115 calories |
| Fat | 7g |
| Saturated Fat | 4.5g |
| Unsaturated Fat | 2.5g |
| Trans Fat | 0g |
| Cholesterol | 25mg |
| Sodium | 190mg |
| Carbohydrates | 9g |
| Fiber | 0.5g |
| Sugar | 0.5g |
| Protein | 4g |
Frequently Asked Questions
What is the difference between tapioca flour and tapioca starch?
There is no difference. The terms are used interchangeably to refer to the starch extracted from the cassava root. Ensure your package says ‘tapioca flour’ or ‘tapioca starch’.
Can I make this recipe dairy-free?
It is challenging due to the nature of the ingredients. You would need to use a high-quality vegan cheese that grates and melts well, along with a full-fat coconut cream or another dairy-free cream substitute. The flavor and texture will be different from the original but can still be delicious.
Why did my cheese breads turn out flat instead of puffy?
This could be due to a few reasons. The most common is an inaccurate oven temperature. Make sure your oven is fully preheated to 400°F (200°C). It could also be that the dough was too wet. Different brands of tapioca flour and cream can have varying moisture levels. If your dough seems excessively runny, you can try adding another tablespoon of tapioca flour.
Conclusion
With just three ingredients and minimal effort, you can bring the irresistible taste of a Brazilian bakery into your own kitchen. This recipe for Pão de Queijo is proof that simple, high-quality ingredients can create something truly spectacular. Whether you’re a seasoned baker or a complete novice, you can achieve perfectly puffed, cheesy, and chewy bites of joy. We guarantee that once you try them, these will become a permanent fixture in your recipe collection.